

Hello Everyone!!! Oh boy, do I have some fun things to show you this month!! Divinity Designs have some A-MAZ-ING dies that you will love!!! Today I've been using lots of new products and I have to say I am totally addicted already, so hang on because I've got LOTS to show you! :)
My first project is a Milk Carton Holder and Milk Cartons! OMGOSH how CUTE are these!!! So I found some blue bazzill to create my holder and followed the instructions inside the packaging to put it together using Christmas Collection 2019 paper for the layers. Heads Up - to make sure the handle layer matches the base card would be easier with a magnetic plate. I've always thought - who needs a magnetic plate? - so I don't own one and have changed my mind on its value. Doesn't mean you can't do this without it - hey I managed! :) Line it all up using the instructions, but to keep the dies in place I've used several pieces of removable tape and it worked just fine! Also - you will need a larger sized die machine for the width of this die! Then I got cracking on the milk cartons, cutting them out of white card and layering with the Christmas Collection 2019 paper. (You can get all the layers out of one 6x6 piece of paper!). Once I've glued those down, I've embellished with stars cut using Sparkling Stars dies and a mix of silver and white card. I've also cut the 'Christmas' out of silver card using Christmas Greetings dies. Finally I've cut the tag using Treat Tags Dies and secured the tops of the cartons with mini white pegs!


Stamps: NONE
Ink: NONE
Paper: DD Christmas 2019, Blue, White, Silver Glitter
Custom Dies: DD Dies: Milk Carton Holder, Milk Carton with Layers, Sparkling Stars, Treat Tags, Christmas Greetings; X-press It Foam Tape, Glue, White Mini Pegs


My second project is a Four Fold Card!! I loved the finished effect, even if it was a little tricky to photograph! The sentiment is actually ONE LARGE sentiment (see below), that I *carefully* inked and stamped in versamark ink and then embossed in silver detail embossing powder over three separate pages. The silver is actually light and shimmery but it is so hard to photograph! Also, a heads up on this Four Fold Die set - you will need to have the facility to cut LONG dies as this die is about 12inches long.
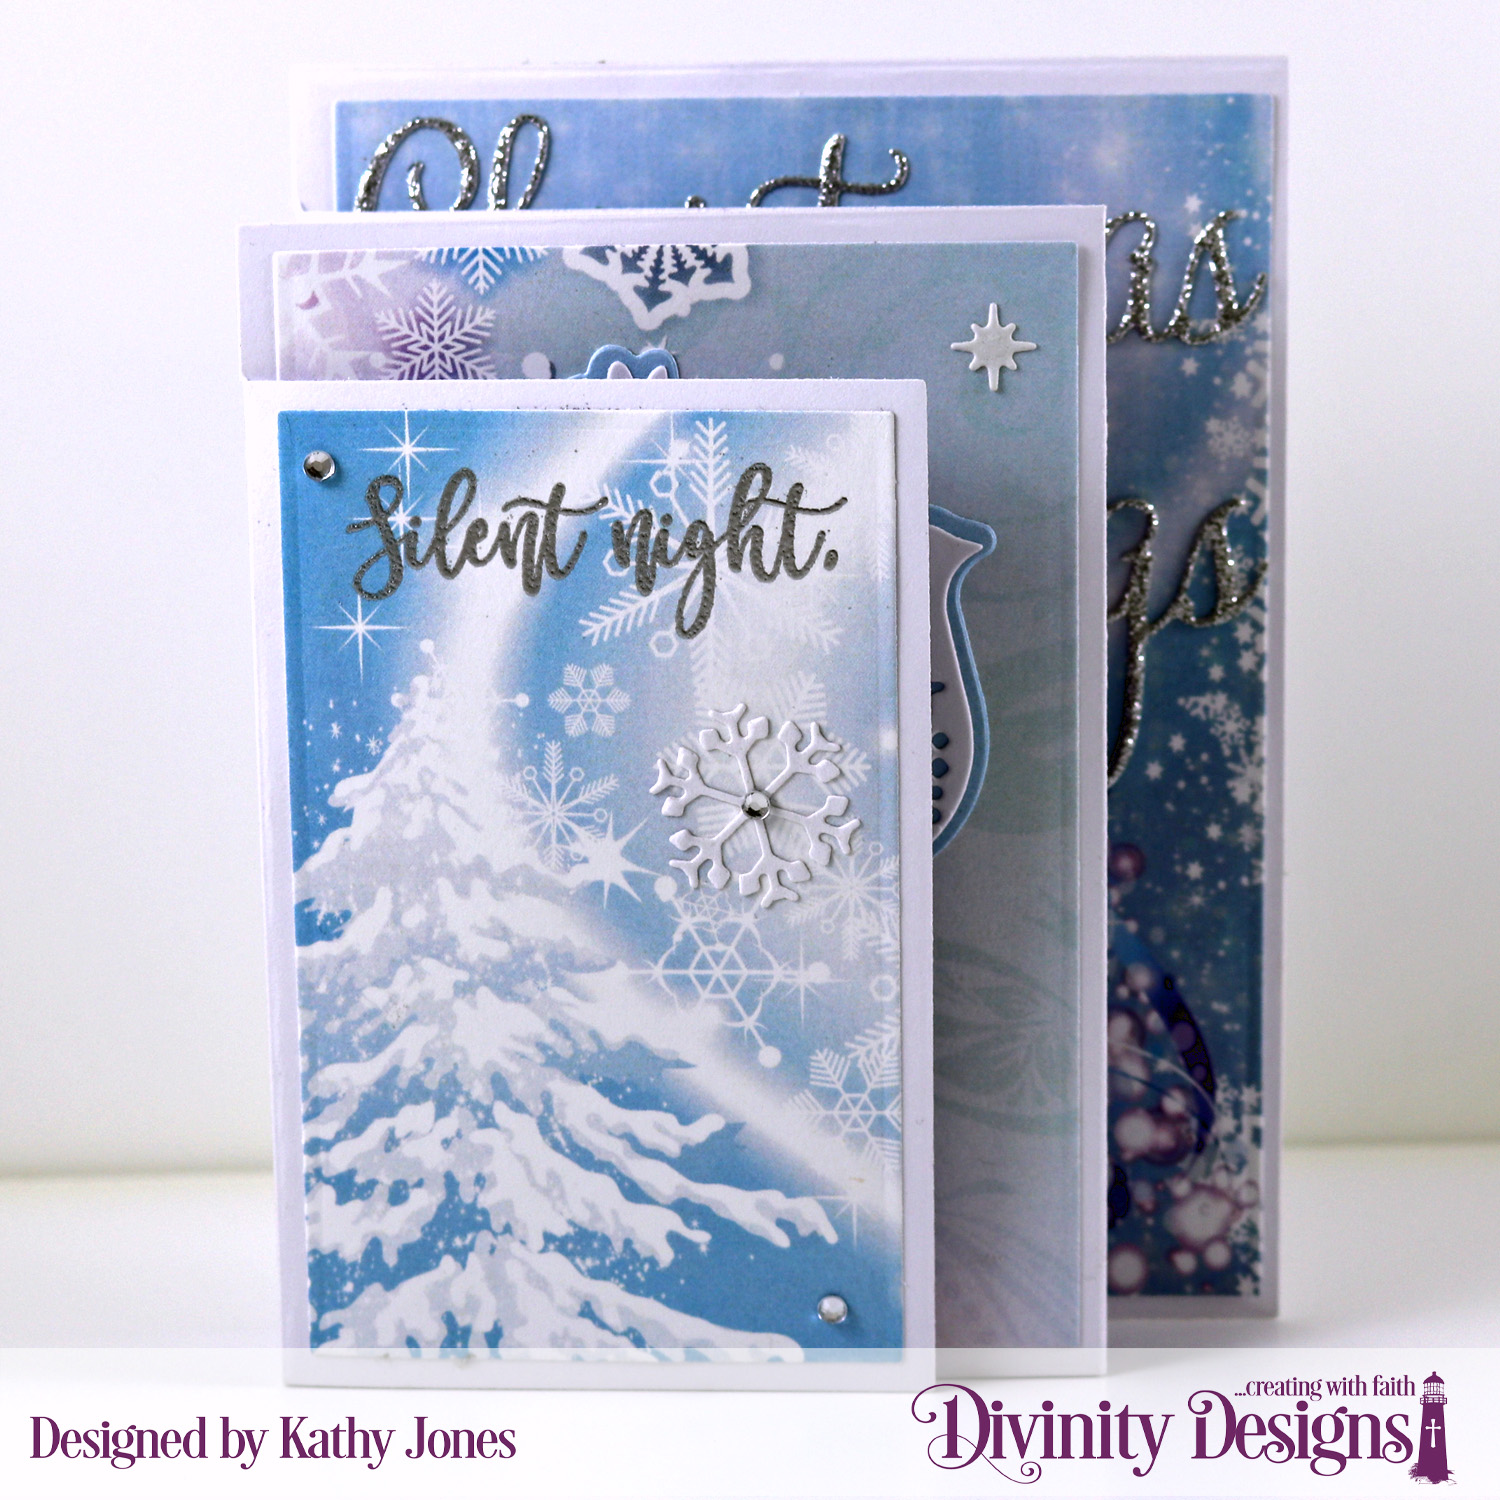


So I've started this project cutting a piece of white card using the largest Four Fold Card Die. (You should use 12inch paper for it to fit, but Aussies, if you are using our standard A4 Cardstock which is about 11 3/4inches, the flap at the end will cut a little short, but you can still get away with using it as the layering paper will cover that it's short.) I've also cut the front panel out of white and then used the layering dies and the Christmas Collection 2019 paper for the decorative paper panels. (I LOVE THIS PAPER!) Before I've attached the layers, I've masked and stamped the sentiment from Silent Night in pieces to spread throughout the card with versamark ink and embossed with silver embossing powder. I've cut the Dove and lots of the snowflakes from Christmas Dove out of white and then used a clear spica to add shimmer to the snowflakes (once again hard to photograph but they look pretty!). The Dove is matted with the light blue paper from Christmas Collection 2019 and cut with the matching die. On the last panel I've diecut the Christmas Greetings out of Silver Glitter paper and attached with glue. To finish I've added some Silver Glitter Deco Tape, White Sequins and a couple of clear rhinestones (front panel only).


Stamp Set: Silent Night (Divinity Designs)
Ink: Versamark
Paper: DD Christmas Collection 2019, White, Silver Glitter
Custom Dies: Four Panel Card with Layers,
Christmas Dove, Christmas Greetings; X-press It Silver Glitter Deco Tape, White Sequins, Silver Embossing Powder, Clear Rhinestones, Glue, Heat Gun, Spica Pen
If you thought that was the end, I still have ONE MORE project for you today!! For my last project, once again I have used the Milk Carton Holder but filled it with 4oz Coffee Cups decorated with the brand new Mini Coffee Cup Wrapper and Layer dies!! I love that you can use the holder with either the Milk Cartons or the 4oz Coffee Cups!!


I've followed the same procedure as able for constructing the holder but made it out of cream card and Follow the Son paper.

You can purchase these white 4oz Coffee Cups along with the Mini Coffee Cup Wrapper and Layer Dies at Divinity Designs! I've made the wrapper out of Follow the Son paper. Over the join I've made the circle panel using Circles Dies, Double Stitched Circles Dies and Pretty Posies Dies. For a bit of fun, I've tied up the cups with some grosgrain ribbon and attached a button to the bow.

Stamps - NONE
Ink - NONE
Paper - DD Follow the Son Paper, Cream
Accessories - DD Dies: Milk Carton Holder, Mini Coffee Cup Wrapper and Layer, Circles, Double Stitched Circles, Pretty Posies; Grosgrain Ribbon, Brown Buttons
Did you make it all the way to the end of this ginormous post??? WOW, thanks for hanging in all the way to the end! I hope you love this new offering from Divinity Designs as much as I do and if you are looking for even more inspiration, you can check out Divinity Designs Blog, Facebook, Pinterest and Instagram. Thanks for visiting today and hope you are inspired to stamp! :)
1 comment:
Oh wow! These are so cool!!
Post a Comment