Sunday, June 30, 2019

Floribunda


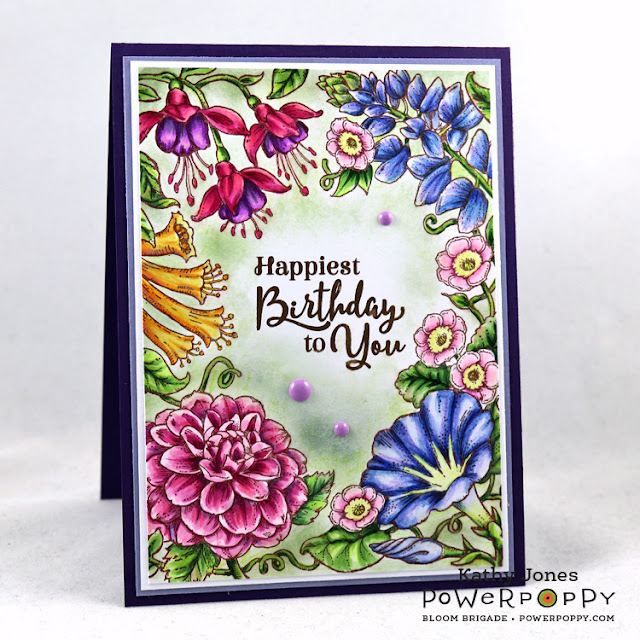
Hello Everyone!  It's Day 5 of the Power Poppy Enchanted Garden Release!!  Today's set is a big bold floral to fit the entire front of your card!  Also includes a couple of smaller images as well as sentiments that all fit in the centre of the floral frame.  Let us introduce you to.... FLORIBUNDA!


Well this card is ALL about the image!  I have a dark purple base, light purple base and some white card for the layers and then the image layer......almost a one layer card (well for me anyway! LOL!).  I've stamped the image and sentiment from Floribunda in Icing on the Cake ink onto X-press It Blending Card and then coloured with Copics and some pencils and then sponged some green ink for the background.  Trim to size, add a few enamel dots and you're done!

Stamps - Floribunda (Power Poppy)
Ink - Catherine Pooler Icing on the Cake, Memento New Sprout, Tim Holtz Bundled Sage
Paper - X-press It Blending Card, White, Light Purple, Dark Purple
Accessories - Copics, Pencils, Enamel Dots

The Bloomies and Instant Gardeners have some gorgeous creations waiting for you, so get hopping to these blogs and check them out!!
Allison Cope
Christine Okken
Kathy Jones
Stacy Morgan
Barb Walker
Nancy Sheads
Leslie Miller

The Power Poppy Blog 

Tomorrow is RELEASE DAY and all these awesome sets you've seen this week will finally be available!  We have an incredible hop planned for tomorrow, including PRIZES that you won't want to miss, so I hope pop back for that!!  Thanks for visiting and hope you are inspired to stamp!  :) 
Saturday, June 29, 2019

Summer Berries


Hello Everyone!  Today Power Poppy has another sneak peek for you called Summer Berries!  This set has three images and an array of fabby sentiments!


I started by stamping the image from Summer Berries onto X-press It Blending Card and colouring it with Copics and pencils.  I was trying for something a little different - I think I over thought the bird!  Birds are a challenge for me, so I googled an Australian Red-Browed Finch as inspiration.  I thought it would be interesting with it's red face and green wings......I think I need more work!  In going with my 'let's try something different idea' - I've taken a stencil and blending brush and used Scattered Straw ink to create a bit of a background.  I don't know......what do you think??

 
I've created the rest of the card with a red base, layer of brown, some Maja Designs paper and die cut the curve of the front with a border die.  I've created the top by cutting some brown card with Scalloped Rectangles die and trimmed to size and topped with a red ribbon.  Finally I've stamped the sentiment from Summer Berries added some enamel dots.

Stamps - Summer Berries (Power Poppy)
Ink - Memento Rich Cocoa, Catherine Pooler Icing on the Cake, Tim Holtz Scattered Straw
Paper - X-press It Blending card, Maja Designs Life in the Country Paper, Red, Brown
Accessories - Simply Dies Borders, Divinity Designs Scalloped Rectangles, Urban Artist Stencil, Blender Brush, Red Ribbon, Enamel Dots

Ready for some super sweet creations?  Check out these blogs and leave a little love!


That's all from me today, there's another day of sneak peeks tomorrow so I hope you join us then!  Thanks for visiting and hope you are inspired to stamp!  :)
Friday, June 28, 2019

Strong and Beautiful


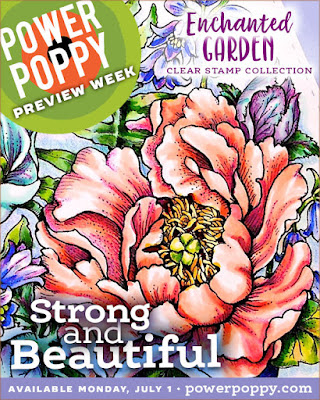
Hello Everyone!  It's Day 3 of the sneak peeks at Power Poppy!!  The latest addition to the Enchanted Garden collection is..... Strong and Beautiful.  And beautiful it is!!  With a stunning large floral arrangement complimented with two smaller accent pieces and a range of celebratory sentiments, this set is bound to be a go to!

http://powerpoppy.com/products/strong-and-beautiful

So I decided to focus on the two smaller accent images and give them a moment to shine.  I've die cut a rectangle of X-press It Blending Card with Double Stitched Rectangles Die and stamped the Hellebore (Lenten Rose) in Rich Cocoa ink and then masked it and stamped the fern frond all around it.  I've also used the sentiment from Strong and Beautiful and I've then coloured this panel with Copics and then added a little pencil as well.

My card is created with a base of green, topped with cream and some Golden Grove paper.  Around this is a piece of golden brown ribbon.  I've added another piece of Golden Grove paper and then added the diecut 'brickwall' made with kraft card and Texture 4 Die.  My coloured feature panel has been matted with kraft card and popped up on foam tape and I've finished with a few chocolate pearls.

Stamps - Strong and Beautiful (Power Poppy)
Ink - Memento Rich Cocoa, Catherine Pooler Icing on the Cake
Paper - X-press It Blending Card, Green, Kraft, Kaisercraft Golden Grove Paper Pad
Accessories - Paper Rose Texture 4 Die, Divinity Designs Double Stitched Rectangle Die, Brown Ribbon, Kaisercraft Chocolate Pearls

There's so much more to see by hopping on over to these blogs....


That's all from me today, there's more coming in the release so hope you'll pop by and visit tomorrow!  Thanks for visiting and hope you are inspired to stamp!!  :)

Thursday, June 27, 2019

Woodland Carpet


Hello Everyone!  It's Day 2 of the Enchanted Garden Power Poppy Release!  Today we are showcasing another new clear stamp set called Woodland Carpet!  This beautiful set includes two larger images and three smaller images along with a range of sentiments which would be suitable for either masculine or feminine cards.


I've created my card with a base of cream, layered with rust coloured card.  I've diecut some light brown card with Divine Eloquence and glued this on top of these layers.  Next I've stamped the image from Woodland Carpet in Rich Cocoa onto X-press It Blending Card and coloured with Copics.  I've diecut the coloured image with Labels 28 and finished off the sky and soil while it was still in the die and then attached it to the top of the card.  Finally I stamped the sentiment from Woodland Carpet onto white card die cut it and popped it up on foam tape.

Stamps - Woodland Carpet (Power Poppy)
Ink - Rich Cocoa, Icing on the Cake
Paper - X-press It Blending, Cream, Rust, Light Brown
Accessories - Spellbinders Labels 28, A2 Divine Eloquence, Fancy Framed Tags, Glue

You can find gorgeous creations using this set made by the Bloom Brigade and Instant Gardeners below!!  Pop by and leave a little love! 

 
That's all from me today, don't forget to pop by tomorrow for another peek at a new Power Poppy stamp set that you are bound to love!  Thanks for visiting and hope you are inspired to stamp!!  :) 

Wednesday, June 26, 2019

Big Sexy Blooms!


Hello Everyone!  Have I got news for you!!  Power Poppy is releasing a new range of clear stamps called the Enchanted Garden Collection!  There are FIVE beautiful new sets to make you gasp and grab your favourite colouring medium and get creating!  Today we are sneak peeking Big Sexy Blooms which will be available (along with the other four sets) on July 1st.


Ever since I was little I've loved daisies and this bold background beauty of Gerbera Daisies speaks to my soul!  I've stamped Big Sexy Blooms in Icing on the Cake ink onto X-press It Blending Card and coloured with a whole lot of Copics.  I decided to let the background shine and accent it with a punched border......which I had nearly completed when my FAVOURITE border punch broke.  I honestly nearly cried.  SIGH!  So I started over with a different border punch to do the edge.  I've then added a layer of white and then trimmed my Big Sexy Blooms layer to size and wrapped a piece of white ribbon around it.  I've been a bit sneaky and added a sentiment from another new set - Strong and Beautiful - but you have to wait until Friday to hear all about that set!!  :)  I've stamped that also in Icing on the Cake ink, die cut with Pierced Circles and layered with Circles dies and popped it up on foam tape.

Stamps - Big Sexy Blooms, Strong and Beautiful (Power Poppy)
Ink - Catherine Pooler Icing on the Cake
Paper - X-press It Blending Card, White, Blue
Accesories - Divinity Designs Pierced Circles and Circles Dies, Blue Ribbon, Lattice Border Punch, X-press It Foam Tape

There's LOTS of inspiration for you today, so pop on by these blogs and see what the girls have been creating!


 That's all from me today, pop back tomorrow for another amazing set to drool over!!  Thanks for visiting and hope you are inspired to stamp!!  :)

Friday, June 21, 2019

Creating with Divinity Designs


Hello Everyone!  Today the Divinity Divas are having a look back at the June Release!  I've made two projects today that I hope you'll enjoy!

My first project is a Cascade Card!  I've used the Cascade Fold Card with Layers to cut a blue base and the layers are cut using Notable Notes Paper.  I've then cut LOTS of black cut using Musical Notes Dies and attached them as shown.  Finally I've stamped the sentiment from Marvelous Things, die cut with Pennant Flags Dies and lightly airbrushed with Copic V09 Marker.

Stamps - Marvelous Things (Divinity Designs)
Ink - Black
Paper - DD Notable Notes Paper Pad, Blue, Black, White
Accessories - DD Dies: Cascade Fold Card with Layers, Musical Notes, Pennant Flags


My second project is a card with a green base topped with light blue card.  Next I've taken white card, cut and embossed with Sunburst Background Die.  While still in the die, I've airbrushed it with some Y17 Copic.  Across the bottom, I've added a piece of Pearl Deco Tape.  I've stamped the sentiment from Color My World in black and die cut with Scalloped Ovals and popped up on foam tape.  Next I've die cut the Globe using Globe and Stand Dies out of white card.  I've lightly coloured this with Copic.  Next I've cut another piece of white using Circles Dies and sponged blue ink on it and glued the two pieces together and popped it up on foam tape.  To finish I've embellished with clear rhinestones.

Stamps - Color My World (Divinity Designs)
Ink - Black, Blue
Paper - White, Blue, Green
Accessories - DD Dies: Globe and Stand, Sunburst Background, Scalloped Ovals; Copic Marker Y17, Copic Airbrush System, Xpress It Foam Tape, Clear Rhinestones

You can find even more inspiration at these locations the Blog, Webpages, Samples GalleryFacebookPinterest and Instagram. Thanks for popping by and hope you are inspired to stamp!  :)

Saturday, June 1, 2019

Divinity June Release!


Hello Everyone!  It's the beginning of a new month, so that means it's time for a new Divinity Designs Release!  This month there is a huge range of stamps and dies to choose from and I've been working with the new Cascade Fold Card with Layers Dies as well as the new Globe and Stand Die, Bubbles Stencil and Color My World Stamp set.

For my first card, I've used the amazing Cascade Fold Card with Layers Dies and combined them with a range of stamps and dies to create a tropical theme including - Aloha Stamps for the Bird of Paradise and sentiment in the front - Bird of Paradise is coloured with Copics and diecut with the matching Bird of Paradise Die.  Other dies include, Bitty Blossoms, Ferns, Frangipani and Tropical Leaves.

Stamps - Aloha (DD)
Paper - Divnity Designs By The Shore, Cream, Green, White
Ink - Black
Accessories - Divinity Designs Dies: Bitty Blossoms, Ferns, Frangipani, Tropical Leaves, Cascade Fold Card with Layers, Grass Lawn, Bird of Paradise; Copics, Glue


My second card features the new Globe and Stand Die, Bubbles Stencil and Color My World Stamp Set.  I actually started this with the Bubbles Layer, cutting the panel using Rectangles Dies, adding Weathered Wood Distress Ink and then placing the Bubbles Stencil over the top and applying Atelier Moulding Paste.  I've heat set the bubbles and then matted with white and green card and attaching some sheer ribbon and attached it to a dark blue base cut with Pierced Rectangles.  Next I've die cut the Globe and Stand out of brown and white card, colouring the continents of the globe with Copics.  To create the background, I've die cut the matching shape using Circles Dies and gave it a watercolour wash.  Next I've stamped the sentiment from Color My World and die cut with Pennant Flags and trimming to size.  I've finished by attaching to a white card base and embellishing with a few clear rhinestones.

Stamps - Color My World (DD)
Paper - White, Blue, Green, Brown
Ink - Black, Weathered Wood 
Accessories - Divinity Designs Dies: Rectangles, Pierced Rectangles, Globe and Stand, Circles, Pennant Flags; Divinity Designs Stencil: Bubbles; Atelier Moulding Paste, Copics, Kaisercraft Clear Rhinestones

That's all from me today, but there are some AMAZING creations that you won't want to miss, so pop over to the Divinity Designs Blog to check them all out!

Thanks for visiting and hope you are inspired to stamp!  :)

LinkWithin

Related Posts with Thumbnails